Scum Run - Code Breakdown
- Dwight Gibson
- Jun 2, 2021
- 8 min read

Updated: Jun 4, 2021
You, The Player

The player is built from a basic Third Person Character template, taking care of most of the work. I modified the jump portion in particular so that, on a jump, the player's jump animation plays once, then a delay - roughly the length of the jump itself - occurs before the jump can be done again.

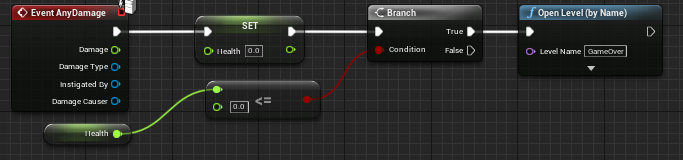
The top image of this set is a pause command which pauses the game and creates the pause menu. On a backspace press, the menu is created, a reference is set, the player's cursor becomes available and the game pauses. The lower image of this set loads the game over screen upon the player's death. through a standard health check.


Here's one of the beauties of the game - the growth/shrink mechanic. On pressing the shrink key (Q), the game checks for the player's current size. If the player is currently normal-size, they shrink to 1/3 their size - established using a timeline track - and the game sets the small-size Boolean on and the normal- and large-size Booleans off. If the player isn't normal-size, the game runs a second check - looking for large-size this time. If the player is large-size, they shrink by 1/2 their size using a different track, altering the Booleans again. These different sizes are useful for many things: small-size can fit in tight spaces and small holes; while large-size can break crates and kill enemies.

This code allows the player to damage crates as part of their destructible process. The game checks for an overlap, checks the player's size and casts to the crate. If the player is large-size, they'll damage the crates. If not, the crates will be unharmed. If the crates are damaged, they'll break and stay visible for five seconds before the actor is destroyed.

Here, the game sets some basic variables: maximum walking speed; the velocity of the player's jumps; the gravity; and the player's health, score, and collected trash cans. What happens afterwards,, however, gets a little complicated, so I'll come back to it in a bit.
Your Enemies
Enemies currently have two basic functions: movement and attacking or being attacked.

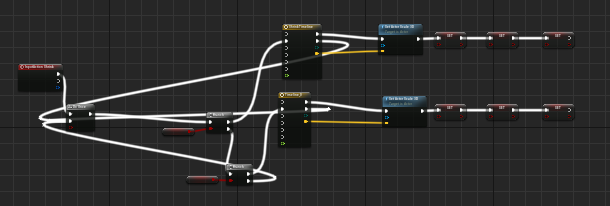
The first code I made for the enemies was the attack code. On an overlap of components, the enemy casts to the player to check their size. If they're not large, the player will be hurt, resulting in death. If they ARE large, however, the enemy gets killed instead. Their walk speed is set to 0, their attacking collision is destroyed to prevent damage dealt to the player, the death animation is played and, after some time has passed, the actor is destroyed. Killing an enemy nets the player 250 points.

Enemy movement begins with setting their walk speed. With their default speed, the enemy goes a little too fast for the player to deal with. Afterwards, two AI MoveTo nodes allow the enemy to move to a random location within a radius of 4000 UE (Unreal Engine) units of their current location - give or take 5 UE units. Simultaneously, their walk animation also plays on loop until their death.
Bricks, Crates and Cubes

Okay, this one I'm proud of. When the player overlaps with a collision barrier of the cube, it checks the player for their size. If it's not large, the cube acts as a standard obstacle, wasting the player's time. If the player is large, however, the cube can be damaged and destroyed, fracturing into several pieces. This is achieved through the use of a plugin - Apex Destruction - which allows for the creation of destructible meshes. This was kind of tough to get working but the results are superbly satisfying. After five seconds, the cube and its chunks are fully destroyed to prevent an overflow of assets. Destroying a cube nets the player 1,000 points.
This brings us to a small problem, though. If the player is small- or normal-size, they can still easily push the cubes out of the way. This is when we apply a well-known method of keeping the player out of where they aren't meant to be...
Invisible Walls
Have you ever played a game and wanted to explore somewhere, only to be met with your character running/walking in place or a notification saying something along the lines of "LEAVING AREA OF OPERATIONS," you've stumbled across an invisible wall of some kind. It prevents the player from going where they aren't supposed to go. Invisible walls for this project exist in two forms.

Firstly, the basic invisible wall. It's an invisible cube with a larger collision box. The collision settings allow an overlap on assets, ignoring the camera. It, in essence, blocks the player from going through. Perfect for keeping them away from those crates, huh? But how do they actually break those crates when they can't get past the invisible wall?

This is where the second form comes in. This one is the same as the first one but with an extra snippet of code that checks for the player's size on overlapping the collision box. If the player's large, the wall is gone and they can get to the crates. If they're not, they can't get through until they are.

Another invisible wall acts as a goal. This one doesn't block the player. When the player passes through, it saves the time in which they completed the level to the game instance and sends them to the completion screen.
Collectibles
Games usually have their fair share of collectibles, whether they be puzzle pieces to open new areas of exploration, cassette tapes to find lore about the world or even ammunition so you can finally kill that enemy. For this game, however, it's garbage and garbage cans. For the player to actually collect these, they need collision and code to get them to work.
Trash Cans - A Massive Load of Points

On the player overlapping the collision, the trash can casts to the player and ups their score by a juicy 5,000 points and increasing their count of trash cans collected. After that, it destroys itself since it is no longer needed.
Tiny Blobs - Absorption and Growth

On the player overlapping the collision, the blob casts to the player and checks their size. As long as they aren't large-size, they'll grow to the next size: small players grow from 0.3x to 1x; normal players grow from 1x to 2x. The player's size Booleans are also adjusted accordingly. Since these blobs can only be used once, it destroys itself after use. Growing from a blob grants the player an additional 500 points.
Menus and Navigation
Sure, the player could jump straight into the level, but that wouldn't allow for the customisation element - you know, the main point of the project. Menus allow the player to do just that.

As soon as you load the game, you're greeted with the main menu screen. For simplicity: a background; a title; two buttons. Multiple menus in the game act in this way. The buttons used in the game all follow a simple template: on click, do this. The "this" can be anything from opening levels to actually quitting the game, which is cool. Colours also give a general indication of what the button can do, taking influence from day-to-day life: green good; red bad.
Completion
Upon completing a level, you're greeted with a screen which summarises your progress: collectibles collected; points earned; and your time, just to name a few.


The first thing we do is register how many trash cans were collected. The menu casts to the game instance and retrieves the variable. This variable is good enough as a standalone number but let's put something visual in. More "if" branches check whether the value of trash collected is a certain amount and sets that many collected icons appear on the screen.

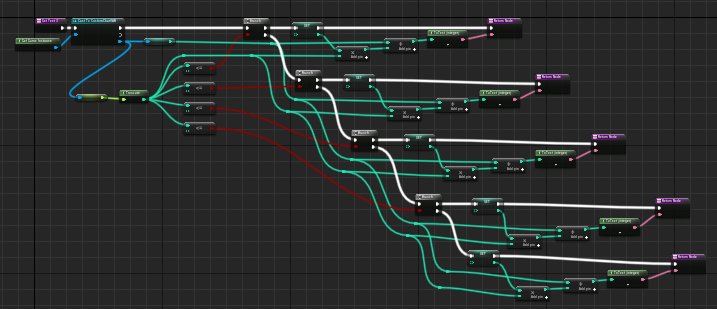
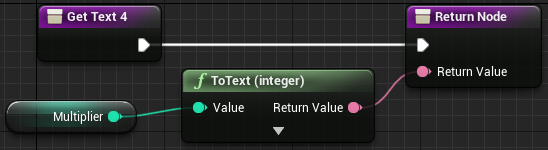
Next, let's work on getting a time multiplier. The game reads the completion time from the game instance, truncates it to a pure integer format and checks whether it's less than or equal to four basic times. Yet more "if" branches come in. If the completion time is less than or equal to the first completion time, the time is multiplied by 12 and gets added to the score. If not, check for the next one. The multiplier goes from 12x to 6x, then 3x, then 2x, and finally 1x or no multiplier. The multiplier is also saved as a separate value for displaying to the player.


The score and time are also displayed as their own separate text boxes through a simple retrieval process, same as before.
The total score is also displayed, comprising of enemies killed, crates destroyed, growth blobs absorbed, trash cans collected, and the aforementioned time bonus.
Customisation
The customisation in the game was, if I can be honest, a real pain to make - more so when you consider that I'm effectively a beginner at Unreal.

The first part of the puzzle is the dropdowns for body colour, body shape (which ended up unused) and inner/outer eye colours. On a change, the dropdowns each cast to the custom-made game instance - which carries across variables between levels, for instance - and sets the associated variable there to what the selection is. They also open up the next option due to a reason I'll explain later. After setting the body and eye colours, you can then select an accessory or go straight into the game.

Having a dropdown for accessories would be rather boring so, instead, we have a grid of options. Clicking on a square saves the selection sets the visibility of that associated accessory, available on the player's model, to visible while rendering the rest invisible. Simple, right? Not exactly. The way I did this is actually rather confusing, for lack of a better term.
Firstly, each option clicked sets a variable to the option chosen. Then, we cast to the game instance and set the accessory selection variable there to whatever the accessory selection variable here is.


Now back to the player character. Remember that section of code where we set those variables on loading the map? Off of that, we cast to the game instance and look for the body colour variable. The game runs a check for one value said variable could be and if it's true, we set the player's body element to a specific material which we made beforehand. Materials define not just colour but texture as well. If the variable isn't that colour, we run another check for a different colour. Rinse and repeat for each colour then, again, rinse and repeat for the outer and inner eye colours. After those come the accessories. The beginning is the same - read the variable, match it to another in a plethora of "if" branch checks - but instead of simply setting a material, we set visibility of the particular element on or off. More customisation options can be added to this through having the player able to change the accessory's materials but that's something I'm glad I didn't implement.
You may recall I said earlier about an issue I had. Well, due to how I actually achieved this, I actually made it so that, in order to select an accessory, the player has to select an inner eye colour, which requires them to select an outer eye colour, which requires them to select a body colour. Otherwise, it won't actually show until the player has actually changed each of the settings. I tried to connect these to an event tick node but it changes nothing. There's probably an answer I'm missing but I honestly have no idea.
"How do I make the player visible while restricting their movement?"
The answer I've used is to cheat. It's not actually the player that's there. Instead, it's a dummy player to show the customisation before going into the game. The customisation code is the same but there's no movement code. As such, the player can't take control.
The HUD
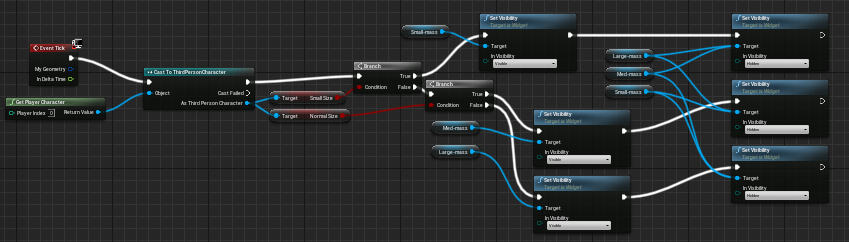


Linking with the growth/shrink mechanic, the HUD shows the player's size. The HUD casts to the player, reads their size, two "if" branches, set the visibility of the icon on the HUD. The amount of garbage cans collected is also shown through the use of a cast.
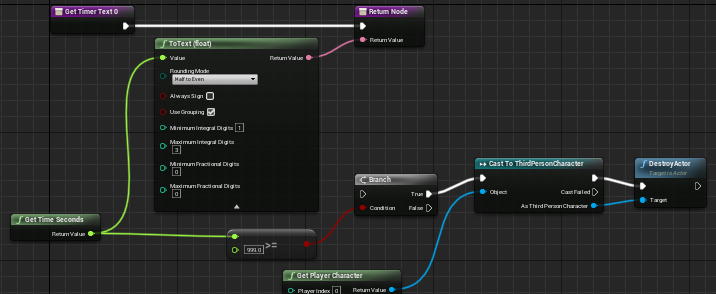
The timer is made by the HUD, taking a seconds-only approach. The timer is sent to the HUD as text. If the timer exceeds 999 seconds - which it won't - the player dies.
"How can I make UI elements load?"
There are two main ways we've used to make UI load. If the player's in the level, connect the HUD to them and, on begin play, construct the element. A very reliable method is to put the same code on the level blueprint.
Trampolines

A trampoline is a very useful traversal tool to reach places you can't reach. The basic layout of a trampoline's code is, on overlap, cast to the player and set their launch velocity to this. Naturally, multiple trampoline templates can be made that launch the player in different directions.


Comments